Table of contents:
- Do-it-yourself construction of a fence from corrugated board
- 1. Fence with metal pipes as support posts
- 2. A fence with posts made of bricks
Video: DIY Fence Made Of Corrugated Board, Installation Of A Fence Made Of Corrugated Board

2024 Author: Bailey Albertson | [email protected]. Last modified: 2023-12-17 12:53
Do-it-yourself construction of a fence from corrugated board

Good day, dear readers of our blog.
For each owner of a house or summer cottage, one of the main tasks is to protect his private property from unwanted intrusion of uninvited guests and prying eyes of passers-by. The first line of defense is to enclose your private plot with a fence. Each person, guided by his desires, imagination and financial capabilities, decides which fence, how and from what he will build.
One of the most common today is a corrugated fence. This is due to several reasons: the budgetary cost of building such a fence, beautiful appearance, durability and relative ease of construction.
How is the installation of a fence made of corrugated board, the technology of its construction, I want to consider today. Moreover, we will consider how to build a fence from corrugated board with our own hands in two versions:
1. A fence with metal pipes as posts
2. A fence with posts made of bricks
Any of these fences with different supporting structures can be divided into two more subsections:
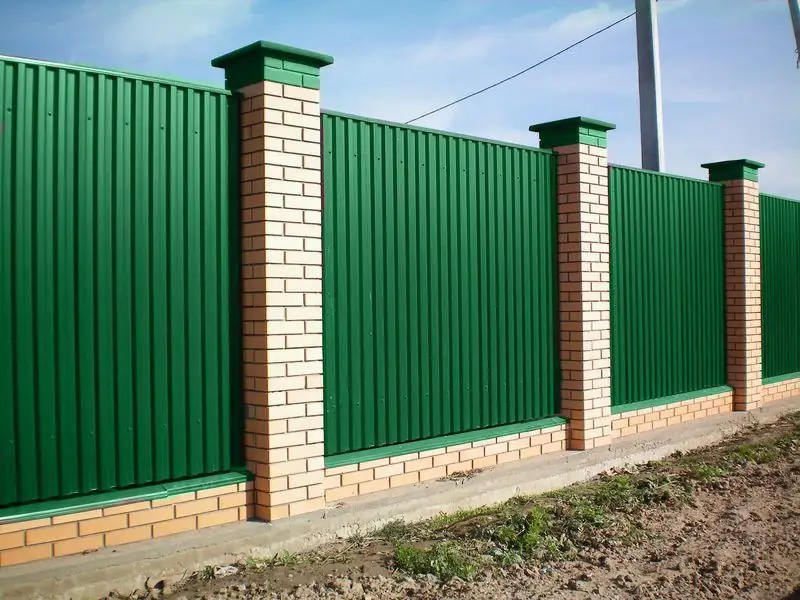
- corrugated board is the entire height of the fence from the ground to the desired height (as in the photo above);
- the corrugated board is raised above the ground with the help of a foundation cast from concrete or a side lined with brick, which connects the support posts;

The first option is the most economical due to the fact that less building materials are used and the construction itself is easier, the second is more beautiful and respectable, but requires more labor costs.
I will consider the manufacturing technology of a more complex, second option, and start with how to make a fence with metal support posts.
1. Fence with metal pipes as support posts
For the manufacture of such a structure, the position of the fence is marked. At present, there are no special questions with this, since when allocating a plot, land surveyors using satellite equipment very clearly define and mark the corner points of the plot on the earth's surface. These points are the corner landmarks for construction. By connecting two corner points, we get one side.
Consider the stages of building one side of the fence step by step (all the other 3 sides will be done by analogy):
Step 1. We install the corner posts of one side at the points indicated by the surveyors. We dig in the column to the required depth (on average, for good resistance of the fence to wind loads, it is recommended to dig in 1/3 of the length). For reliability and stability, after installation and checking the verticality in the longitudinal and transverse directions, you can fill the hole into which the post is inserted with concrete.
Metal pipes of round, square or rectangular cross-section can serve as support posts. The optimum height is 2.5-3 meters.
For a fence in the country or a personal plot, you can use a non-pressure asbestos-cement pipe with a diameter of 100 mm as pillars.

Such a pipe has a length of 3.95 m and two columns are easily obtained from it. Its cost in 2013 was 400 rubles, i.e. one column will cost 200 rubles. Along with its positive moment - the price, the disadvantage of such pillars is their limited length and increased fragility.
Step 2. We install the formwork in order to pour concrete for the side that connects the posts.

The width can be chosen arbitrarily, but 150-200 mm can be made for aesthetic beauty.
Step 3. We divide the entire distance of the fence length into segments of 2.5-3 meters and mark the locations of all the posts on one side of the fence. For beauty, the distances between the posts should be the same.
Step 4. Pull the thread between the extreme (corner) pillars and install the pillars in the marked places.

For convenience, you can pull the second thread from the bottom. This technique will make it possible to install all the pillars in one plane.
The lower part of the pillar is additionally symmetrically positioned with equal distance relative to the formwork so that the pillar is located exactly in the center.

Using a level, we install the post vertically in the longitudinal plane of the fence.
Step 5. Pour concrete into the formwork and let it stand up. At this stage, it is advisable to once again finally check the verticality of all pillars in the longitudinal and transverse directions, as well as that they are all in alignment.

Step 6. We fix horizontal transverse strips to the posts for fastening corrugated sheets.

As transverse strips, you can take a profiled pipe 20 * 40 mm. The lower bar can be positioned at a height of 200-250 mm above ground level (or the level of the cast rim), the upper one at a height of 1500-1700 mm. Fastening to support posts can be done by welding.
Step 7. We fix the corrugated sheets vertically.

For fastening the sheet, you can use roofing screws for metal. Currently, it is possible to choose their color in accordance with the color of the corrugated board.
This completes the installation of a fence made of corrugated board of this type. You can admire your work.
2. A fence with posts made of bricks
From my point of view, this is the most beautiful and practical type of fence, although the cost of manufacturing it will cost a little more. It is perfect for the fence of a private house or garden plot. Having made such a fence from corrugated board with your own hands, you can definitely stand out with beauty and elegance among your neighbors.

Let's consider its production step by step.
Step 1. Mark the location of the side of the fence and install the formwork for making the foundation. The foundation must be reinforced with metal reinforcement, because the mass of brick from which the pillars and lintels between them will be folded is large and over time the foundation may burst. How to install the formwork and cast the foundation can be read in detail here.
In the places where we will lay out the pillars, we release the reinforcement vertically up. In the future, it will serve as a metal frame, which will be overlaid with bricks.
Step 2. Lay out the pillars and jumpers between them.

If the fence is of standard height, then at a height of 200-300 mm and 1500-1600 mm, we lay metal mortgages with the release of them for further fastening of horizontal strips.

We control the verticality using a level, applying it on all sides of the column.

Step 3. Weld horizontal strips to the mortgages, on which the metal sheet will be vertically attached.

At the same stage, it will be rational to paint all horizontal metal components to protect from atmospheric precipitation and to avoid corrosion.
Step 4. We fix the sheets of corrugated board on the horizontal strips.
This can be done using roofing screws, as described above when building a fence with metal posts, or using rivets.

We drill a hole through the metal sheet and the fastening strip. Using a riveter, we attach the sheet to the bar.
Step 5. To protect the brickwork of the pillars from precipitation, install a cover on top.

In conclusion, I want to say that of course it is up to you to decide which corrugated fence will please the eye. Personally, I made a combined one on my site: the front side with pillars lined with bricks (the color of the bricks of the pillars corresponds to the color of the brick from which the house is laid out). All the other three sides are fenced with corrugated sheets fixed on metal posts.
This combination provides significant savings in material resources and allows you to get a respectable appearance of the fenced area.
Now you, dear readers, know how to install a fence made of corrugated board with your own hands. I hope that there will be no big difficulties in the work.
That's all for me, see you soon. Easy construction work for everyone.
Best regards, Vladislav Ponomarev.
Recommended:
Installation Of Roofing From Corrugated Board, Including With Your Own Hands, The Main Stages Of Carrying Out, As Well As How To Avoid Major Mistakes
Features of working with profiled sheet when covering the roof. What tools are needed, how to make the crate correctly. Installation errors. How to dismantle and repair
Lathing For Corrugated Board, What Needs To Be Taken Into Account During Installation And How To Correctly Calculate The Amount Of Material
What is the crate made of for corrugated board. Types of lathing, calculation of materials and ways to save them. Do I need a counter lattice for corrugated board and its functions
Roofing Made Of Corrugated Board, Including The Features Of Its Design And Operation, Repair, As Well As How To Avoid Mistakes During Installation
Features and characteristics of corrugated roofing. Types of roofing sheeting. Calculation of the amount of material for the roof. Features of installation and operation
Snow Holders On A Roof Made Of Corrugated Board, Including An Overview Of The Varieties, As Well As How To Correctly Calculate And Install
Do you need snow holders for a roof made of corrugated board. Types of barriers. Correct installation of snow guards and calculation of their number
Pediment Made Of Corrugated Board And Its Device, As Well As How To Calculate And Make Correctly
Pediment made of corrugated board: device, material calculation and building instructions. Reviews of the profiled sheet as a covering of the pediment
